How to Build Your Own Lithium Battery Pack for DIY Projects?
Building your own lithium battery pack can be an exciting venture. Expert John Doe states, "Creating a custom battery pack unlocks endless possibilities." With the right knowledge and materials, you can design battery systems tailored to your specific needs. Imagine powering your DIY projects with energy you create.
However, the process can be daunting. Sourcing the right lithium cells and ensuring safety must be your priority. Mistakes can be costly and dangerous. Remember, building your own lithium battery pack requires careful planning and research. You need to be aware of the risks, such as short circuits and overheating.
Consider the unique challenges of assembly. You may face compatibility issues or design flaws. Every error can lead you back to the drawing board. So, while exploring this journey, be prepared to adjust and learn. Embrace the trial and error aspect. It is all part of mastering the art of building your own lithium battery pack.

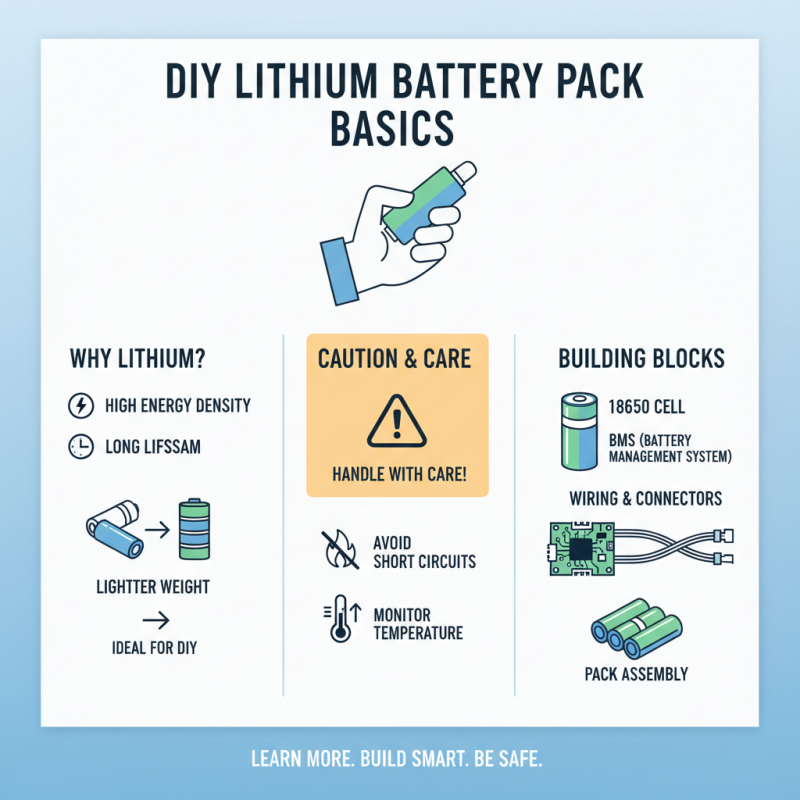
Understanding Lithium Battery Basics for DIY Projects
Building your own lithium battery pack can be rewarding. Understanding the basics is crucial for safe and efficient use. Lithium batteries have high energy density and a long life cycle. They are lighter than traditional batteries, making them ideal for DIY projects. However, handling them requires care.
Many new builders overlook vital details. Always check the voltage and capacity specifications. Mismatched cells can lead to failure or even hazards. When connecting cells, ensure they are in the same state of charge. Mixing charged and discharged cells is risky.
Tips: Always work in a well-ventilated area. Use insulated tools to prevent shorts. Consider using a battery management system for safety. It monitors voltage levels and prevents overcharging. Learning from mistakes is part of the process. Each project can teach you more about handling lithium batteries effectively. Recognize your limitations and seek help if needed.
Selecting the Right Lithium Cells for Your Battery Pack
When creating your lithium battery pack, choosing the right cells is crucial. Lithium-ion cells come in various chemistries, like LiCoO2, LiFePO4, and LiMn2O4. Each type offers unique features. For example, LiFePO4 cells have a long cycle life but lower energy density. On the other hand, LiCoO2 cells deliver higher energy but degrade faster. Understanding your project’s needs is essential.
Consider performance metrics like capacity, voltage, and discharge rates. According to recent industry reports, the average capacity of lithium cells ranges from 1500 to 4000 mAh. This can impact how long your device will operate. Balance capacity with size and weight. Larger cells may provide more energy but can complicate integration.
Tip: Always try to match the battery voltage with your device requirements. Mismatched voltage can result in damaging components.
Researching supplier specifications is another step. It ensures that the cells meet safety standards. Quality matters in project reliability. Aim for cells with a low internal resistance. Higher resistance can lead to heat generation, which is detrimental in small setups.
Tip: Test a small batch before committing to a larger order. This helps identify potential issues.
Designing and Planning Your DIY Battery Pack Layout
Designing a DIY lithium battery pack requires careful planning. Start by identifying your power needs. What devices will you power? Calculate the voltage and capacity required to run your projects effectively. Use online calculators or tools to help with these calculations. It’s essential to match the battery's specifications with the load.
Next, consider the physical layout of the battery pack. Choose a suitable enclosure that fits all the components. Ensure there is enough space for wires and connections. Pay attention to airflow to prevent overheating. Design the layout clearly on paper or using software. This ensures you avoid mistakes later on. Mistakes can lead to short circuits or inefficient performance. Experiment with different designs, but keep safety as your priority.
You might find that the initial design does not work perfectly. That’s okay; learning from errors is part of the process. Test each iteration and refine it. Check connections carefully; improperly connected wires can cause issues. Make adjustments to the layout as needed. Each change can significantly impact efficiency and safety. Remember, this process might take time. Patience and attention to detail are key.
Wiring and Connecting Your Lithium Battery Cells Safely
Wiring lithium battery cells requires attention to detail. Connecting cells in series or parallel alters their voltage and capacity. Use a secure connection method. Soldering can create a strong bond, but it requires practice. Ensure you don’t overheat the cells. Heat can damage them.
Consider using battery holders or connectors for a modular approach. This makes replacing cells easier. Check polarity before connecting cells. Reversing polarity can lead to malfunction or short circuits. It's crucial to balance the cells during charging. Unbalanced cells may not charge effectively.
Test connections with a multimeter. This helps identify any issues early. Wiring mistakes can lead to a risk of fire. Be sure to insulate exposed wires properly. Use heat shrink tubing or electrical tape. A professional look is appealing, but safety is paramount. Remember, practice makes perfect. Mistakes can be educational, leading to a better understanding of how lithium cells work.
Lithium Battery Pack Capacity (Ah) by Cell Count
This chart shows the relationship between the number of lithium battery cells and the total capacity in ampere-hours (Ah) for DIY projects. More cells typically increase the total capacity, which is vital for powering various electronic devices.
Testing and Maintaining Your DIY Lithium Battery Pack
Testing your DIY lithium battery pack is essential for safety and performance. Begin by checking the voltage levels of each cell using a multimeter. Ensure all cells are balanced and within a safe range. If you notice discrepancies, it’s crucial to address them before connecting the pack. Your battery pack should not show significant voltage differences. A small difference might be acceptable, but larger gaps can lead to failure.
Regular maintenance is key to the longevity of your battery pack. Consider using a Battery Management System (BMS). A BMS monitors health, charges safely, and prevents over-discharge. However, sometimes, these systems can fail to calibrate correctly. This can cause issues that might be overlooked initially. It’s vital to revisit your setup often. Unexpected drops in performance can signal wear or damage.
Furthermore, always inspect for physical damage. Occasionally, a cell can swell or heat up. These signs should not be ignored. If something appears off, reassess your connections and overall design. Understanding these details makes you a better builder and helps in preventing future problems. Remember, each project is a learning experience. Reflect on issues, and adjust your approach for next time.